Categories
Sustainability

How our first heat pump winter went

So many people have reached out to ask how we’ve gotten on with our heat pump through the winter.

We even got a week of snow which I wasn’t expecting to see for at least another year so that was a happy surprise.

Whenever I talk about my heat pump people always say “ah, but they don’t work once it gets below zero degrees right?”.

I’d like to debunk that “it doesn’t work when it’s cold” thought with my experience of our first really cold winter.

Getting used to weather compensation

Our heat pump is configured to work with the footprint and heat loss of our home. So everyone’s home with a heat pump is uniquely different and that’s what makes gauging how well they’ll work in your home that much harder.

A proper installation process includes a heat loss survey, an assessment of what heat pump and radiator upgrades you’ll need and an approximate idea of how much it’ll cost to run.

Have to say our install and cost estimate was pretty much spot on.

However the biggest change for us was getting used to the idea of weather compensation – where the flow temperature of the heat pump relates directly to the temperature it actually is outside. The warmer it is outside, the less the unit has to work to get your home up to temperature.

In order to keep the system as efficient as possible, we also had to get used to having the heating on 24/7. Having the heating on at a lower temperature at night in particular took some getting used to. It’s not something I did before. We currently have our house aiming for 20 degrees in the day and 16 degrees at night.

As someone who is more mindful of the environment with each passing year, being more mindful of the weather around me is a good thing. I found myself being more mindful of daily temperatures and forecasts as it got colder. It actually helped me settle into winter a bit better (it’s my least favourite time of year).
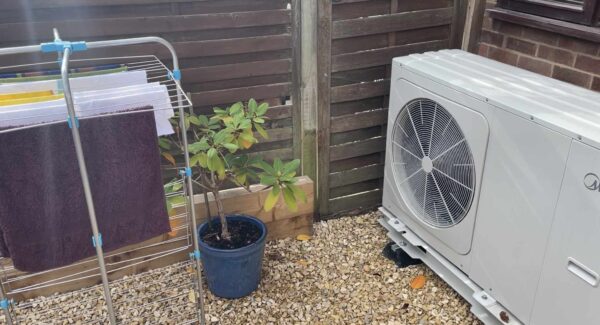
Using the cold heat pump air to dry clothes on a clothes horse.

Isn’t it cold inside?

I am usually cold and I was worried about whether or not the heat pump would heat me and my home sufficiently. I didn’t need to worry. I am always toasty. In fact with weather compensation I think the heat pump is doing better at heating my home than my previous gas system. Possibly because of the improved efficiency, but also due to the care that went into sizing this system.

Lastly, it’s been great not to use gas, especially with the knock-on effect on the war in Ukraine. It’s also been a great relief of climate anxiety to not watch the daily fumes escape our house from the vent. Gas remains in our house (for hob cooking) but I will be very glad to shut this off very soon.

We are settled into heat pump usage and I am very happy with my investment.

Turning the heating on 💸

We switched on in mid-October. A little earlier than we needed to but we were keen to check everything was working OK and as I get up at 6 am each morning (chronic pain is a great alarm clock). I was starting to notice it was getting very cold, and my pain was getting worse.

Getting used to the ambient heating is strange, I put on checked all the radiators and our house is cosy at a 20 degrees average temperature. Only thing that really felt different is the cooler radiators.

Again, I can completely dispel the idea that life with with heat pumps is cold. I’ve been plenty toasty and it’s actually made me a bit hot on a couple of occasions. Really impressive heat.

As a result our house averages 20 degrees on all three floors. The ground floor is normally 18 degrees and our bedroom is 19, the middle floor (where the thermostat is) is usually about 20 degrees or higher. We just leave the heat pump to it and it just works.

Our cats like it too.

Both of our cats sits next to the radiator.

Costs are so subjective, because it depends on your home and your tariff and your circumstances but I can say that he harder the system has to work the more energy used, but so far it averages between 3-8kWh a day to keep us warm in October. Between 10-20kWh in November.

In really cold weather (like the snow we had) we were using about 30-35 kWh per day.

Your mileage will vary though obviously, more information about our home is in this post.

Our house uses more energy heat up until about lunchtime and then it settles and the cost slows into the evening as it maintains heat.

What’s is really like when it’s snowing though?

I’d describe at as toasty – but slightly more expensive. Our heat pump has a estimated COP of 3.67 (above zero degrees), I think that drops to nearer 2.0 when it’s really cold. The whole system has to work harder. Prior to the snow it was working out at about the same as our gas system (not including price rises) with cold weather and snow it was slightly dearer.

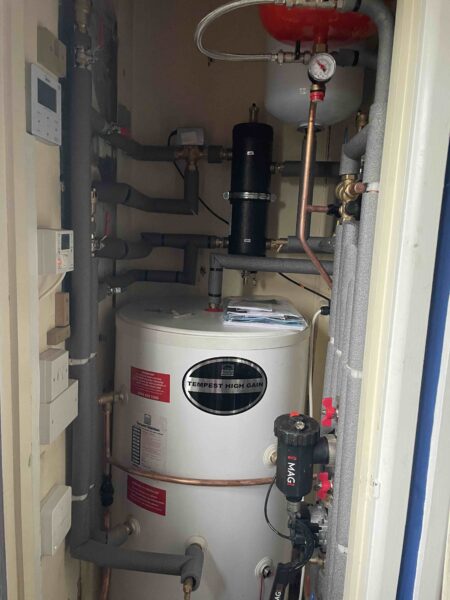
Plus the system itself was working a lot harder. The unit outside was marginally more noisy. I doubt anyone will have noticed, (it’s pretty quiet) but the contents of our cupboard where the pipes, inverter and other equipment was was noticeably louder. A gentle hum permeates the floor that the cupboard is on.

It’s rather like having a boiler in your house to be perfectly honest. I work next to the cupboard all day. The radiators really got hot when it was snowing though that felt a bit more like gas central heating system.

As for the snow on the unit itself outside. Well it was a complete surprise when I awoke to snow as it felt no different in the house. The heat pump worked happily outside. I took a picture of it covered in snow, and cleared the top and sides of it a little, but it’s legs and it’s defrosting worked perfectly. Our lowest temperature outside was -6.

A side view of our heat pump in snow.

Insulation is of course important but becomes even more important at colder temperatures. I really started to notice the impact of heat loss in the snow and it’s something I’ll have to improve. However with our roof and cavity walls done all that is really left is the exterior walls of the original victorian house which will require expensive external insulation. We do also have two windows to replace and that’s about all that’s left that we can really improve.

Overall on price (not including the overall increases to prices) it’s about ~10% more expensive to run – but only on really cold days (sub zero degrees). Every other time it works out about the same (maybe a pinch more) but I have some more ideas on this topic. If you have a well-insulated home you could definitely save more money, it’s such a impressive piece of kit.

Future things to look at

  • Homely by evergreen energy – this device which is installed next to your heat pump internal control helps manage the weather compensation, learns about your houses heat lost and reduces the need to have the heat pump on 24/7. When paired with a smart tariff we could potentially save quite a bit.
  • Smart tariff – We’re working on getting enough usage data (minus gas) to switch to Octopus Energy.
  • Heat pump tariff – Also exploring this offering from Octopus Energy.
  • Insulation – there’s some cheap and easy insulation we can still do, plus I’ll get a survey on some external insulation.

In conclusion then, really happy with our heat pump, works exactly as described it would and our home is always warm and comfortable.


Categories
Video games

How I made a diary walkthrough for Boku no Natsuyasumi (PS1)

One of the reasons I’ve been studying Japanese for many years was so I could start playing games from Japan.

I study for up to two hours every day, reviewing kanji and grammar and I have weekly lessons, and I need lots of (ideally challenging) reading practice.

I’ve had 僕の夏休み (Boku no Natsuyasumi) on my to play list for quite a while. When I finally got around to setting up my MiSTer multisystem it was one of the first games I reached for.

What is Boku no Natsuyasumi?

The games name literally means My Summer Holiday. At face value it’s a sort of life-simulator for a little boy called Boku who goes to stay with his Aunt, Uncle and their family for the month of August in rural Japan in August 1975.

It’s a lovely, pure story about a child being free to spend each day of his summer holiday exploring a new place by collecting bugs, catching fish, flying kites, chatting to others, and solving problems.

And it’s all done in the most beautiful pre-rendered backgrounds. It feels like a sort of hidden gem – at least to the English speaking world as it’s a series of games are that adored in Japan.

A beautiful hilltop sunset in Boku no Natsuyasumi.
Bring back pre-rendered backgrounds!

Memory and nostalgia

Where Bokonatsu really shines though is how it taps into the idea of childhood nostalgia. The idea of looking back and reflecting on good times. Particularly the trope of the summer holiday. Although the game depicts a very particular rural Japanese break it’s a very universal experience that we can all relate to.

I’m not Japanese but the idea of reflecting back on a particularly happy moment in our childhood is something we can perhaps all relate to. When our summer holidays were an enormous block of time that stretched our in front of us and all we had to do was play every day.

The idea of the 田舎 (rural countryside) holiday is a particular fascination in Japan, and I think that explains why this entire series of games is so popular in Japan, it also partly explains why it’s never been localised – it’s distinctly Japanese and perhaps it was felt this could put off some people.

For the Japanese language learning diaspora, it’s a work of art that everyone should play. I hope movements to get a fan translation completed so happen.

A diary guide to Boku no Natsuyasumi

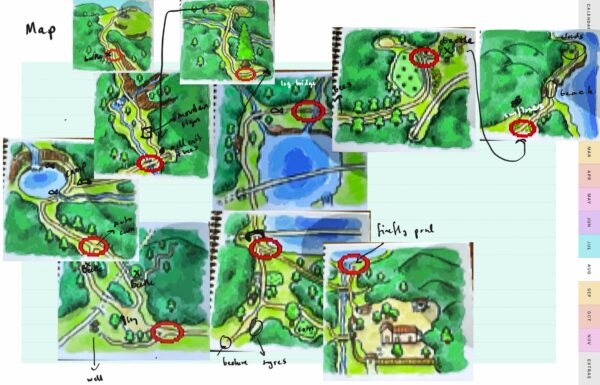
A map I made for Boku no Natsuyasumi.
The stitched together map I made for Boku no Natsuyasumi.

You save the game by writing a picture diary at the end of every day.

I love making notebook entries when I play games. This is something I do routinely. Especially as I get older and there are long stretches between one game session and the next.

I was having fun making kanji and story notes about the game as I went along and then four days in I thought about putting it into a diary format and this resonated with the style of story telling that the game itself uses.

I also put together a map of the whole game area, which may be cheating it’s premise a little bit, but so so crucial to me getting my bearings and helping me remember where I’d explored.

I’m not fluent in Japanese. I understood about 60% of Boku Natsu’s dialogue. That’s kinda why I’ve been playing it. However I figured this was 60% more than the average English speaker and in making my own diary of my playthroughs, I thought this could be of use to others.

Playing a game in second language is a bit like playing a puzzle. I hope you have some lovely epiphany moments too.

View my Boku no natsuyasumi english diary guide here.

Categories
Sustainability

Our first few months with a heat pump

It’s time for an update on my heat pump before what is likely to be a very expensive winter for everyone in the UK starts.

Here’s what we think of the heat pump now that it’s been outside our home for a few months.

Heat pump and hot water

I’ve been very impressed with our heat pump throughout the summer for our hot water. We had good water pressure before but our shower is much improved now. There are two reasons for this. Firstly a pump was put in to improve the pressure from the unit up into our old boiler cupboard as the system is no longer gravity fed. Secondly we have much better temperature control of our water now.

Our old boiler either gave out scolding hot water, or it’s ice cold equivalent. We still have the mixer taps on our shower, but we can now control the top temperature of our hot water far more easily and the hot water takes less time to come out of the tap too.

Heat pumps can heat your water to whatever temperature you like, but we’ve set it a bit lower than the default, with the immersion tank set to heat up the water once a week at 3am every Monday for one hour to get it to 55 degrees (and kill any Legionella and other bacteria in our system).

We basically have the water at the temperature we need and have largely eliminated the need to cool down the water too much. Not something we could have considered with a gas system.

For the first time since I’ve moved into my house I can set my own water temperature, not burn myself and waste less water waiting for it to warm up.

Heating

We put the heating one for one full day back in June to to check all the radiators worked. Although we later realised that the heat pump and thermostat had actually been coming on about 3 times a day in May/June based on the settings that the installer left us with. I turned the thermostat off and the heat pump has not been active since (save for our hot water).

We also had a bit of a scare one day after adjusting the system pressure when no water came out of our upstairs tap. We quickly realised this was due to a big pipe leak in the area and the effect on our system was a complete coincidence.

What it sounds like

The unit outside sounds like a very gentle fan when it’s warming our hot water. It will definitely be louder when it’s colder and working harder. We have heard it going full pace as part of its commissioning and it was fine to be honest. We can’t really hear it from indoors and we won’t be outside for long when it’s really cold.

The pumps, pipes and inverters inside the old boiler cupboard sound rather like our old boiler did only quieter, I work next to this all day and it’s fine. A new thing is that the heating system can be heard through the radiators ever so quietly. I’ll report on this more once we’re using it every day.

We no longer need to have a carbon monoxide monitor in the room where I work, so that’s nice.

Energy usage

We’re averaging about 10-12kWh for our daily total electricity usage at the moment (lighting, appliances and hot water) and of that in the summer 1kWh/day for heat pump usage alone (we know this because it has its own meter). On our current tariff, our total usage costs about £2.50 a day (with no heating). We work from home every day so this checks out.

Obviously this is going to cost a lot more over the winter.

Post install paperwork and compliance checks

We had a couple of additional checks from the Boiler Upgrade Scheme (BUS) where we had to sign some digital documents and provide proof of address and identity. This presumably to prevent fraud.

Ofgem selected us for a desk audit which basically means providing them with more paperwork, photographs serial numbers etc, about 20 documents in total. This is presumably to make sure something has been installed, done adequately and been completed. There was an optional step for them to visit our property, but we were not selected for this and our documents were sufficient.

The Microgeneration Certification Scheme (MCS) also called us separately to double check our contact details and to make sure we were happy with both the installer used and the installation work done.

Questions from others

Does the heat pump cool your house too?

No, most heat pumps that do this are air-to-air heat pumps. These are common in places where central heating are done by units high up on walls that put out air that can be heated or chilled. Most UK domestic heating is water based, so most of our heat pumps are air-to-water or ground-to-water so that existing piping and underfloor heating/radiators can be reused. So in short they can be used to cool your home if they’re the right type of heat pump, but these aren’t as common in the UK.

Does the heat pump output cold air in the summer to cool you down?

Our heatpump has been very inactive when it’s warm, only really coming on to top up our hot water, and when it’s warm this rarely needs to happen. So usually there is no cooling breeze in the garden – but I experienced this happening once on the last day of the UK 40 degree heatwave and it was lovely.

I need to find a way to automate our system so I get an alert when it switches on, so if one of us wants to cool down in the summer we can do this. I am looking at some solutions for this including Home Assistant.

Should the heat pump be put in the sun or shade?

So it can benefit from extra warmth? It will work with the ambient temperature it’s in. This wasn’t a factor mentioned in installation. The most important factors were a) having enough space around and in front of the unit b) us being happy with the location.

What about installation, and your research process?

I wrote about this in another post, check out my heat pump tag.

Next update will be either during, or post this coming expensive winter. Please let me know if you have any other questions.

Categories
Retro gaming

Getting to RMC The Cave without a car

I live near to the most amazing retro gaming museum called RMC The Cave, which just happens to be in my hometown in Gloucestershire.

So if you’re planning a visit to The Cave, and you’d like to get there without a car, this is the info for you. I’ll keep it up to date with any bus/path changes. Please let me know if you spot any mistakes.

Last updated: 17 January 2025

By bus from Stroud

It’s not difficult to get to the cave by bus, but Stroud doesn’t have the public transport infrastructure that a city has, so there’s a bit more local knowledge needed. Don’t worry I’ve got you.

The Stagecoach 67 bus will take you most of the way to the cave, but there is still a ~22 ish minute walk from the closest bus stop to The Cave.

A single bus ticket costs about £3.

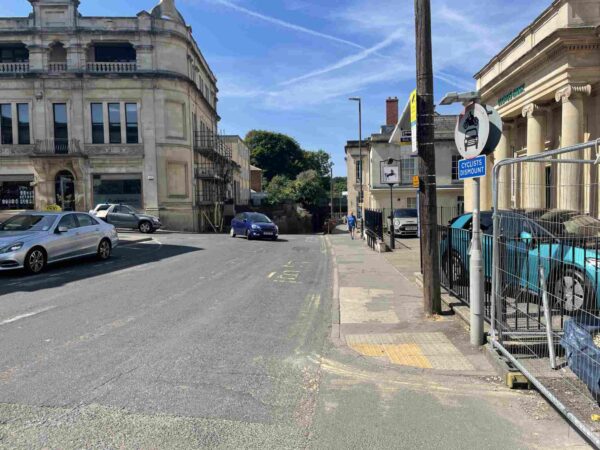
Where the 67 bus stops outside Lloyds back in Stroud.
The 67 bus stop outside Lloyds bank in Stroud

The bus stop you need is outside Lloyds bank in Stroud, which is ~3 minute walk from the train station. There’s also a taxi rank next to the bus stop if you get stuck.

The buses are every 30 minutes, currently the buses to the cave do not operate on Sundays.

You might want to download the Stagecoach app for the live map and bus times. Also, since Covid there have been some regular bus cancelations, so you might want to keep an eye on the Stagecoach West Twitter account too. (As cancellations are not listed in the app).

How to get there

You’ll need to get off at Bourne Estate or Toadsmoor Road stop in Brimscombe. It’ll take about 10 minutes on the bus to get there.

Ring the bell when you see the sign for Felt Cafe (or watch for when you approach the cafe on a map app). There are no screens on the bus to say where you are and there are only paper timetables on the stops.

The bus route in blue and the walk route in orange. View the map in detail.

From here you have two options for walking (~22 minutes)

  1. Walk along the road to Chalford industrial estate (the traffic is a bit fast, and you will need to cross the road back and forth for a pavement, so sorry about that).
  2. See some lovely Stroud greenery and go along the canal tow path. To do this cross the road and follow the tow path going left past the bike shop. It could be a bit muddy and bumpy in wet weather, but you’ll have a beautiful, natural walk to the cave along between the canal and River Frome. You’ll pass through two tunnels, and there are two series of steps to go up/down.
The towpath to The Cave by the Felt Cafe

Towpath partial closure
They’ve closed about 100m of the towpath temporarily this summer for redevelopment. If you’ve gotten off the bus by Felt Cafe, When you reach the blocked off area, follow the road under a very large tunnel, then take the steps on the right hand side (after the tunnel) to get back to road level.
Follow the road here until you can see the Pavilion (Indian Restaurant), opposite this there is a railway crossing to get back on the towpath.

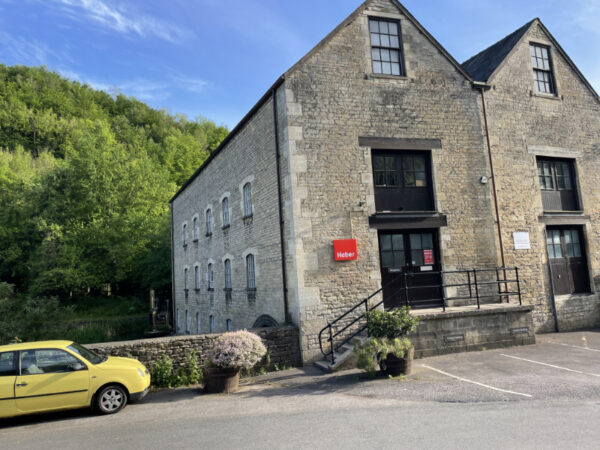
The side of Belvedere mill witha Heber sign
The Cave is on the top floor of this mill, follow The Cave signs.

The Cave will be on your right hand side (after a 20 min walk) once you emerge from the path. Follow the signs for the right entrance to use.

Getting back

The best bus stop to return from is on the same side as Felt Cafe, you’ll need to continue walking past the cafe (towards the garage) to see it. Check that the 67 bus stops there and use the live map to check you’re in the right place. Your day rider ticket will take you back to town.

The bus stop outside the old Peacocks shop.
This is the best place to get off for the train station – just before the post office.

Get off the bus outside Peacocks to be near the train station, failing that the next stop is at the bottom of Merrywalks (but you’ll need to walk back up the hill to get to the train station).

By Bike

The road is faster, but it’s not a very pleasant road to cycle on due to traffic speed, narrowness and people overtaking you closely.

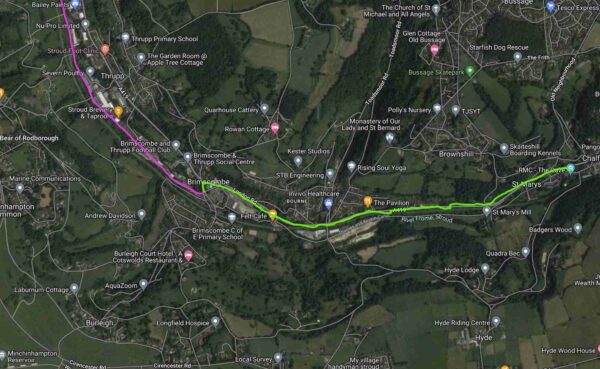
A map of the Stroud area showing the two bike routes to the cave.
The towpath route is shown in pink, and the road in green. View the map in detail.

Road

The road surface is fine, it’s a little bumpy in places. The speed limits vary from 40-60mph. It takes about 20 minutes, but it’s not a very pleasant road to cycle on due to traffic speed, narrowness and people overtaking you closely.

Please note in winter or on late nights, there is very little streetlight from Chalford to Brimscombe and you will need a decent set of lights to see the bumps in the road.

There is a steady gradient uphill for the last mile or so but I’d describe it as a nice, gentle hill (for Stroud).

Towpath

It takes me about 25 minutes to cycle to The Cave from Stroud along the towpath, it’s about 4 miles (depends on your speed).

The towpath entrance that you need next to some lock gates.
The entrance to the towpath at Wallbridge, Stroud

For the towpath find the lock gate at Wallbridge (down from the Lockkeepers Cafe), after about 5 minutes you’ll eventually reach a crossroads (after a tunnel) with a signpost, follow the sign up to the right to Brimscombe, and follow the road along for a short distance to get back on the towpath.

Towpath partial closure

They’ve closed about 100m of the towpath temporarily this summer for redevelopment. So at the moment it might be best to cycle on the road from the crossroads at Brimscombe lane. Otherwise you’ll need to carry your bike through a couple gates and some steps on the towpath (follow the walk instructions above. The pavements on the road are narrow and very, very bumpy and unpleasant to cycle on, but that’s another option.

It’s a shared used path so please be sensible when it comes to speed and be kind to others. There are two spots that will require you to carry your bike up/down stairs. One of these has a step free route (but one) right by the cave does now.

I would not recommend cycling on the towpath in the dark, there are large stretches with no lights at all. The surface is very bumpy and rough in places (it starts off very tidy) so it’s not suitable for road bike tyres.

Feedback

Hope that helps, please let me know if there are any updates or if you have any issues.

Categories
Sustainability

How our heat pump installation went

Following on from my last blog post about how we researched our heat pump. We’ve just finished having the unit, new equipment, electrics and plumbing done. Our home has been upgraded with a heat pump.

It’s exciting to finally have one in our garden after months of researching it. There’s lots of information online about how heat pumps work but not quite so much on how the install goes and what’s involved in that step by step. So here’s a breakdown to everything that happened and what to expect.

How it went

This is just my experience of installation, your home and therefore your setup and experience may be entirely different, but I really wanted to provide a bit more detail around what actually happened on each of the days.

We worked from home for the duration of the project. There was loud drilling and sawing for short periods of time on each day. Mostly because new pipes and power lines were drilled from the external house wall into our boiler cupboard area and near the fusebox.

The workmen worked quickly, put protective sheets down on our carpets, took off their shoes and made sure our indoor cats didn’t escape!

We had a really positive experience with the installation overall.

What to expect

  • We were advised there would be 5 days for work, but it ended up taking 6 (as the electrician wasn’t available to wrap up the project until the following week)
  • We were without hot water for around 3 days. This was while the old water storage tank was removed and the new tank (with immersion heater) was installed
  • We had about a half day without cold water while our old water storage tanks in the attic were removed and new water storage and expanders were installed
  • We were without heating for the duration of the project (for about a month beforehand due to boiler breaking) but if this wasn’t the case, we would have been without heating for 8 days, basically from the moment the installation started (with everything disconnected) to the moment the electrician commissioned the heatpump
  • There was no power in our home for about 2 hours in total on the final day while the heat pump was made live with the fuse box and other electrical work in the old boiler cupboard was done.

How to prepare for heat pump installation

We weren’t given any instructions for what to do to prepare our house, so this is what I’d suggest to do before your installer arrives.

  • Inform your neighbours ahead of time about the noise and roughly when you’ll complete, especially if you have any party walls
  • Completely empty your boiler cupboard, removing all shelving and any other objects, so only the plumbed units and electrical controls are in there with no other clutter
  • Clear the room around where your new tanks and plumbing will be (in our case the boiler cupboard), the installers had a lot of equipment and they’ll need somewhere to leave their equipment each night
  • Make clear space around where your current water storage is, or make your attic accessible as best you can as they’ll need space to work and remove these if applicable
  • Make space in the garden for all the equipment, pipes and boxes that need to be delivered and obviously, clear where the heat pump needs to go.

Day 1

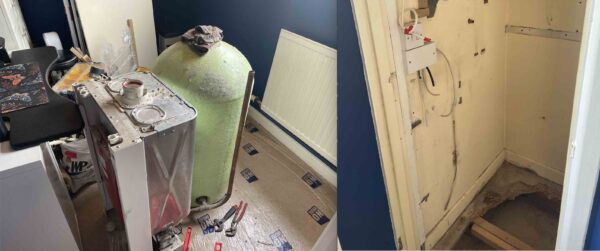
Old boiler and tank is removed, showing the empty cupboard where they both were
Felt good to get rid of that old boiler and tank, also here’s the empty cupboard where they lived.
  • Delivery of items for install (including 200 litre water cylinder, 8kW Midea heat pump, 5x radiators, 1x towel radiator among many other things)
  • Removal of immersion heater, old boiler, and two old water storage tanks
  • Prepping the cupboard for the cylinder (new, stronger floor needed)
  • Placement of cylinder in cupboard
  • Removal of old pipes
  • Loss and restoration of cold water
  • Loss of hot water
  • Recycling of old tanks and boiler

Day 2

  • Removal of old radiators
  • Hanging new (larger) radiators
  • Plumbing in cylinder, adding extra stop valves
  • Installing most of the items in the old boiler cupboard
  • Putting the heat pump unit in place
  • Deciding on plumbing and wiring routes for heat pump
  • Recycling of old radiators

Day 3

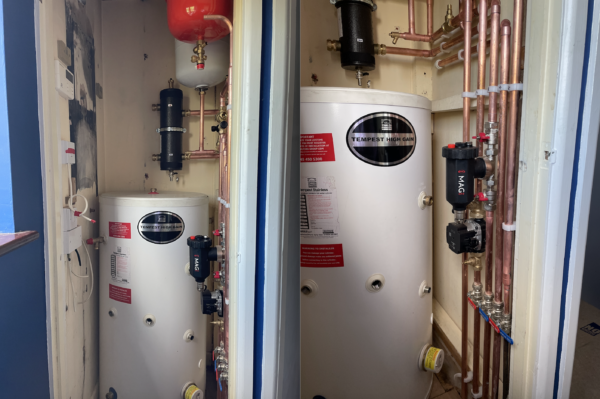
You can see the water tank, expanders (white for cold water, red for hot water) the diverter at the top and the black magnetic filter on the right.
  • Hanging last radiator
  • Soldering all the new radiator connections
  • Drilling three holes into the external wall for the heat pump connections
  • Placing and soldering pipe route from outside of house into old boiler cupboard
  • Restoration of hot water (from new immersion heater)

Day 4

It’s important to have some space around all sides of the heat pump, this shows it quite well.
  • Moving our outdoor tap
  • Putting feet on the pump to give it clearance on our drain
  • Unboxing pump and placing it in our garden
  • Finishing external pipework and connecting to heat pump
  • System pressurised and air removed by bleeding radiators

Day 5 (half day)

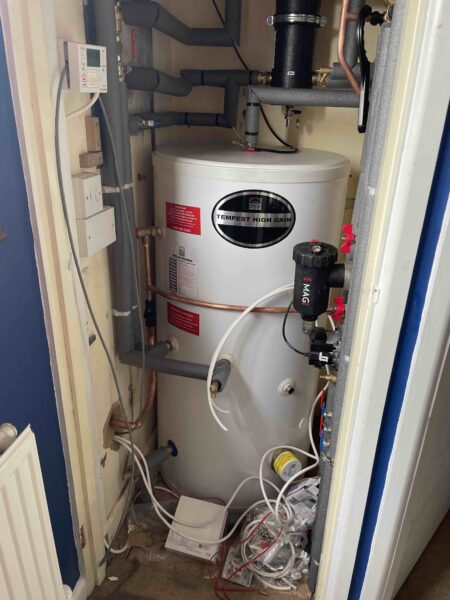
Ready for the electrician to start.
  • Filling in old flue hole
  • Clearing rooms of tools and mess
  • Adding lagging (foam wrapping) to internal and external pipes
  • Registering our new water tank

Day 6 (half day)

  • Electrician visit – drilled holes for power wires to heat pump
  • Connected heat pump to home, from line to fuse box
  • Added an outside isolator switch
  • Added meter to calculate electricity usage just for heat pump
  • Wired in internal controls for heat pump and immersion heater
  • Installed Midea heat pump internal control and Honeywell wireless thermostat and receiver
  • Loss of about power for about two hours total on and off (with warning)
  • Commissioning of system and showing us how to use our three control panels (heat pump, thermostat, immersion heater)
  • Handover of manuals etc.

Wrapping up

So all in all it was a really positive experience and I am looking forward to how our system does in its first year. I’ll be collecting lots of data as I go to compare how the heat pump does to our old gas boiler.

Next time: initial impressions from our first few weeks with a heat pump and what it feels and sounds like inside and outside the house. Plus some starting impressions of how it’s managing heating our water and home.